It can be hard knowing where to get started on RV life. We have all been there.
Here I will explain the basic steps in building a simple Camper Van. When I say simple, I mean no kitchen or bathroom. First, I want to note, make sure the mechanics of your van are good to go. It will be less of a headache in the future. My husband and I built a Camper Van out of a minivan, but it’s basically a similar process for other van models.
Disclaimer: if you decide to get more detailed when it comes to the steps like demo, insulation, or framework, please do so with caution. Each vehicle may have electrical, side curtain airbags and other details you want to have knowledge in when handling these obstacles.
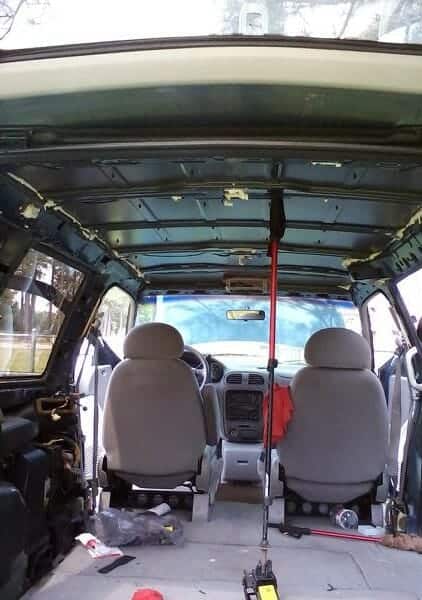
Take out the backseats, the flooring, headliner, and anything on the sides of the vehicle. You pretty much want to have an empty metal box minus the driver and passenger seats up front.
HAVE FUN DOING THE DEMO
First step to building your Camper Van, demolition. Take out the backseats, the flooring, headliner, and anything on the sides of the vehicle. If you want to preserve these pieces to put back in, then handle with care and store them for later use. You pretty much want to have an empty metal box minus the driver and passenger seats up front.
Take caution with the electrical issues and side curtain airbags in this step. Disconnect the battery before rerouting any wiring. This is advanced, so maybe skip this step or have someone with experience help you. Make sure you give your van a good clean because it will be hard to reach those spots in the future. Basic tools needed:
- Wrenches-This Intertool combination set will give you a good variety for whatever size you need.
- Drill-Dewalt has always been reliable for us for building plus the cordless comes in handy with those hard to reach spots.
- Trim Removal Tool-This Neiko set is very universal for all your trim needs.
Honestly, any brand will do when it comes to the tools in this article. Even an off brand tool you can make use of in this project as long as you take care of your tools.
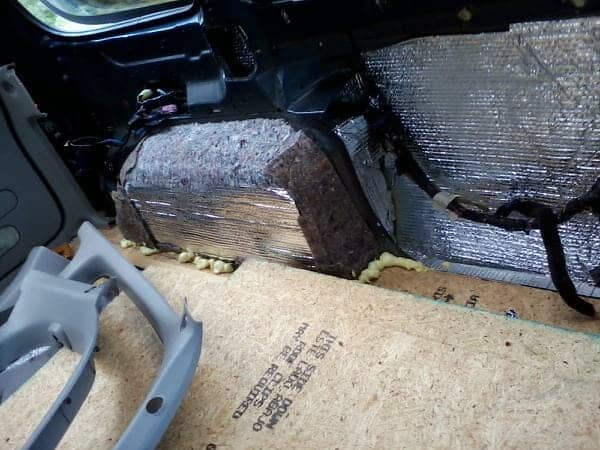
Attaching reflectix to every exposed metal surface using high strength spray adhesive will ensure it stays in place. Reflectix tape can be used on the seams of the reflectix.
INSULATION
You will be thankful for this small detail in those 100 degree summer days or those 30 degree winter nights. Insulation will also make it quieter in your Camper Van. Attaching reflectix to every exposed metal surface using high strength spray adhesive will ensure it stays in place. Reflectix tape can be used on the seams of the reflectix.
Most of the supplies in this article you can get at your local home improvement store or online. If you have extra reflectix leftover you can use it for window covers. Don’t be afraid to insulate the front of your van as well if you are up to the task. Basic tools needed:
- Respirator-This is a good quality respirator that helps keep your lungs safe properly.
- Eyeglasses
- Scissors
- Good Ventilation
Self-Taken. You need a solid floor as a base for framework if you want cabinetry or added storage. Plywood will work fine. To frame out your shelving or storage use 1×2 strips of pine. 1/8th inch or 1/4 inch luan plywood is good for covering your framework for drawers and storage options.
FRAMEWORK
If you are going simple then skip to the next step after putting the van’s original headliner, flooring and trim pieces back. Now for you advanced folk, vans are curvy not square. This step will provide you the basic skeleton, so you can build a more usable space for your Camper Van. If cabinetry, a bed that converts into a couch, and extra storage is what you want then:
- You need a solid floor as a base for framework. Plywood will work fine. Using liquid nail will help keep it in place.
- To frame out your shelving or storage use 1×2 strips of pine. You will use self tapping screws to secure your framework to the metal of your Camper Van. Make sure not to drill through your vehicle.
- 1/8th inch or 1/4 inch luan plywood is good for covering your framework for drawers and storage options. Use wood screws and wood glue to hold everything together.
- Don’t forget to sand the cover to your framework. It will be easier to paint or stain your wood when it’s on a smooth surface.
A good trick is to make a mock design with cardboard first then trace it onto the wood. You can use this trick for your bed in the next step as well. It will help you get the correct measurements and lessen the mistakes on the final project. Basic carpentry tools needed but not limited to:
- Tape Measure-Craftsman is another good brand for tools and measuring.
- Skillsaw-Can’t go wrong with Skilsaw, that helps us get the job done right.
- Pencil
- Square-This is a simple yet great tool for framework.
- Sander/Sandpaper-Like the drill, Dewalt aids in making the sanding process a lot easier and less time consuming.
- Drill
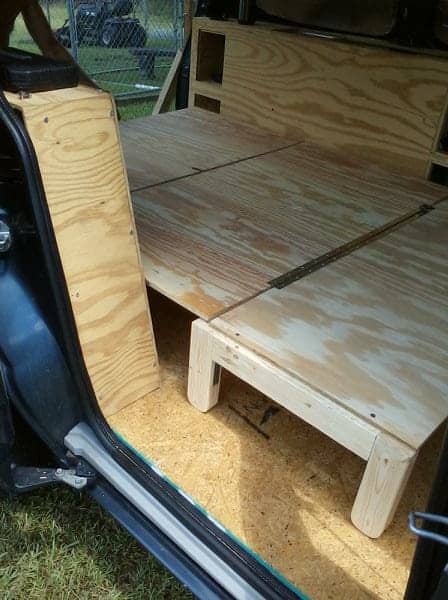
Building a bed provides more storage underneath and the possibility to convert your bed into a couch. We built a base and a hinged flat sleeping surface to go on top of that.
BUILDING THE BED (Optional)
Building a bed provides more storage underneath and the possibility to convert your bed into a couch. This is advanced so don’t feel the need to do this step. There are plenty of simple alternatives you can buy for bedding materials.
We built ours in a way where we had a bed, couch, and storage underneath. We built a base and a hinged flat sleeping surface to go on top of that. Here are some examples of details we did:
- For the base of the bed we used ¾ inch plywood. We used four small hinges so that the bed could fold into a couch.
- 2×4 pieces of wood was used for the storage underneath the base of our bed. Wood screws and wood glue was used to keep it together.
- We created legs at the end using 2×4 wood to keep the end of the bed up. That helps it slide into a couch and create more easy access storage underneath.
- Another small detail we did was create an underpiece similar to the legs of the bed to put underneath in the middle for better support.
To be honest it was a bit overkill for us and time consuming. Simpler can be cost effective, less time consuming and not as much of a hassle. If you are going advanced, the basic carpentry tools needed are:
- Skillsaw
- Tape Measure
- Square
- Pencil
- Drill
- Note: Try to utilize the mounting options the original seats were fastened to when bolting down the bed. After this next step of course.
We chose a more simple design. We did linoleum flooring, a warm stained wooden ceiling and siding, as well as a white granite spray paint for the trim work.
ADDING THE DETAILS
If you are a creative soul, you will be right at home. Whether you want a minimal design or go crazy with your Camper Van it is entirely a personal choice. We chose a more simple but still time consuming design which included:
- A linoleum flooring,
- A warm stained wooden ceiling and siding,
- A white granite spray paint for the trim work.
- For added protection, it would be a good idea to polyurethane after you stain your wood.
Remember, that too much weight can put more of a workload on your Camper Van. Basic tools really depends on how you want your van to look. You may need a lot or hardly any at all, so some research will be handy in this process.
Securing the bed in place ensures it will stay stable while using it and when driving.
FINISHING TOUCHES (Optional)
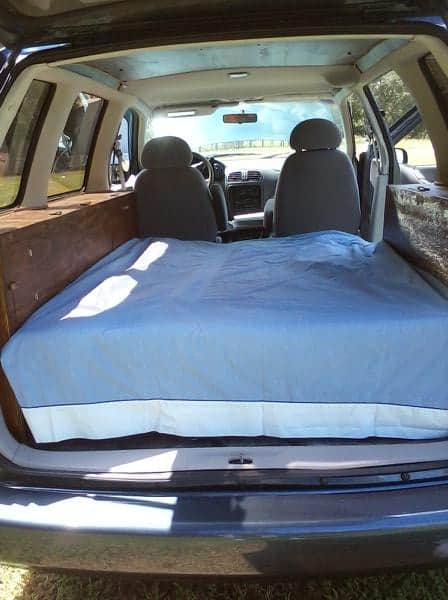
This is the part where if you made a bed you would secure it in place. If you built underneath storage that the base of your bed sits on, then use L-brackets and wood screws. You will need four L-brackets for each corner of your storage design to bolt down.
We used 3 inch foam for the mattress. If you did the futon-style bed design, you can cut the foam into pieces so they can move as needed. The bedding should keep the foam in place. Velcro is a good solution to keep it from sliding.
Whether or not you are doing a bed, totes are a good storage option. They also serve as a good table. A simple hiker mat and good sleeping bag is a good bed alternative especially if you are going the more minimalist route. Basic tools needed:
- Drill
- Wrenches
A good way to keep your Camper Van protected is to give it a good wash, and wax it. If you keep up with that detail, it can extend the life of the outer shell.
MAKE THE OUTSIDE LOOK GOOD
Whether or not you want to go stealth or stand out, you should put some thought into the outside of your Camper Van. A good way to keep it protected is to give it a good wash, and wax it. If you keep up with that detail, it can extend the life of the outer shell. It also protects against sun damage, scratches, and preserving the paint design.
Certain amenities like batteries, solar panels and stoves can make living in your van feel more like home.
IDEAS TO MAKING IT MORE LIKE HOME
Here are some ideas for amenities like hot food, power for your devices, hot showers, etc:
- Advanced Elements 5 Gallon Summer Solar Shower-Super durable and on a good sunny day your water will get hot especially if you have a piece of reflectix to put under it.
- Goal Zero Nomad Solar Panel-Great solar panel for charging your phones and tablets at a quick speed.
- Coleman Butane/Propane Mix Fuel and MSR Pocket Rocket Stove-These products put together make a basic and convenient portable kitchen.
- Rockford Pocket Power/Jump Starter-When there is no sunshine, this battery is a good backup to your solar panel. Also good for jumpstarting your Camper Van.
- Holmes USB Fan-If you are planning to be a desert dweller or explore the Southeast in the summertime, this fan is good to have.
We put those items to the test and we were happy with the results when living in our Camper Van. Other items that will come in handy since you will have to utilize outside space as well are:
- Mini Fold Up Chairs-These chairs are small but durable to withstand the elements.
- 6 Gallon Water Jugs
- Cooler for storing cold food
- A good mini shovel …If you have no bathroom amenities, you will have to dig one.
THERE YOU HAVE IT!
Those are the basic steps to building a simple Camper Van. Don’t hesitate to design it the way you want. This is your home after all. Always remember don’t go overboard with some of these steps. If it’s out of your expertise, then choose an alternative or have someone experienced to help you. No need to get hurt or damage the van in this process. Now pack up your gear….or your house and hit the road. Enjoy!


